

이번 게시물에서는 프로젝트 세팅부터 간단하게 타임리프로 게시판 리스트를 보여주는 것까지 진행하려고 한다.
프로젝트 스펙
- JDK 17
- Spring Boot 3.4.1
- Gradle
- Database
- 데이터베이스는 스스로 편한 것을 사용하면 된다. 필자는 Oracle로 진행하려고 한다.
- IDE: IntelliJ
- IDE 또한 자신에게 맞는 것을 사용하면 된다.
이후, 필요한 Dependency는 중간중간에 코드를 추가하는 방식으로 하겠다.
프로젝트 세팅
프로젝트는 보통 IDE 내에서 생성하는 방법이 있고, https://start.spring.io/ Spring Initializr에서 Zip 형식으로 프로젝트를 다운로드할 수 있다.
어디서 프로젝트를 받든 동일하기에 편한 방법으로 하자.
아래는 IDE 기준으로 설명하겠다.
경로: File > New > Project... 을 통해 들어오면 아래와 같은 화면을 볼 수 있다.
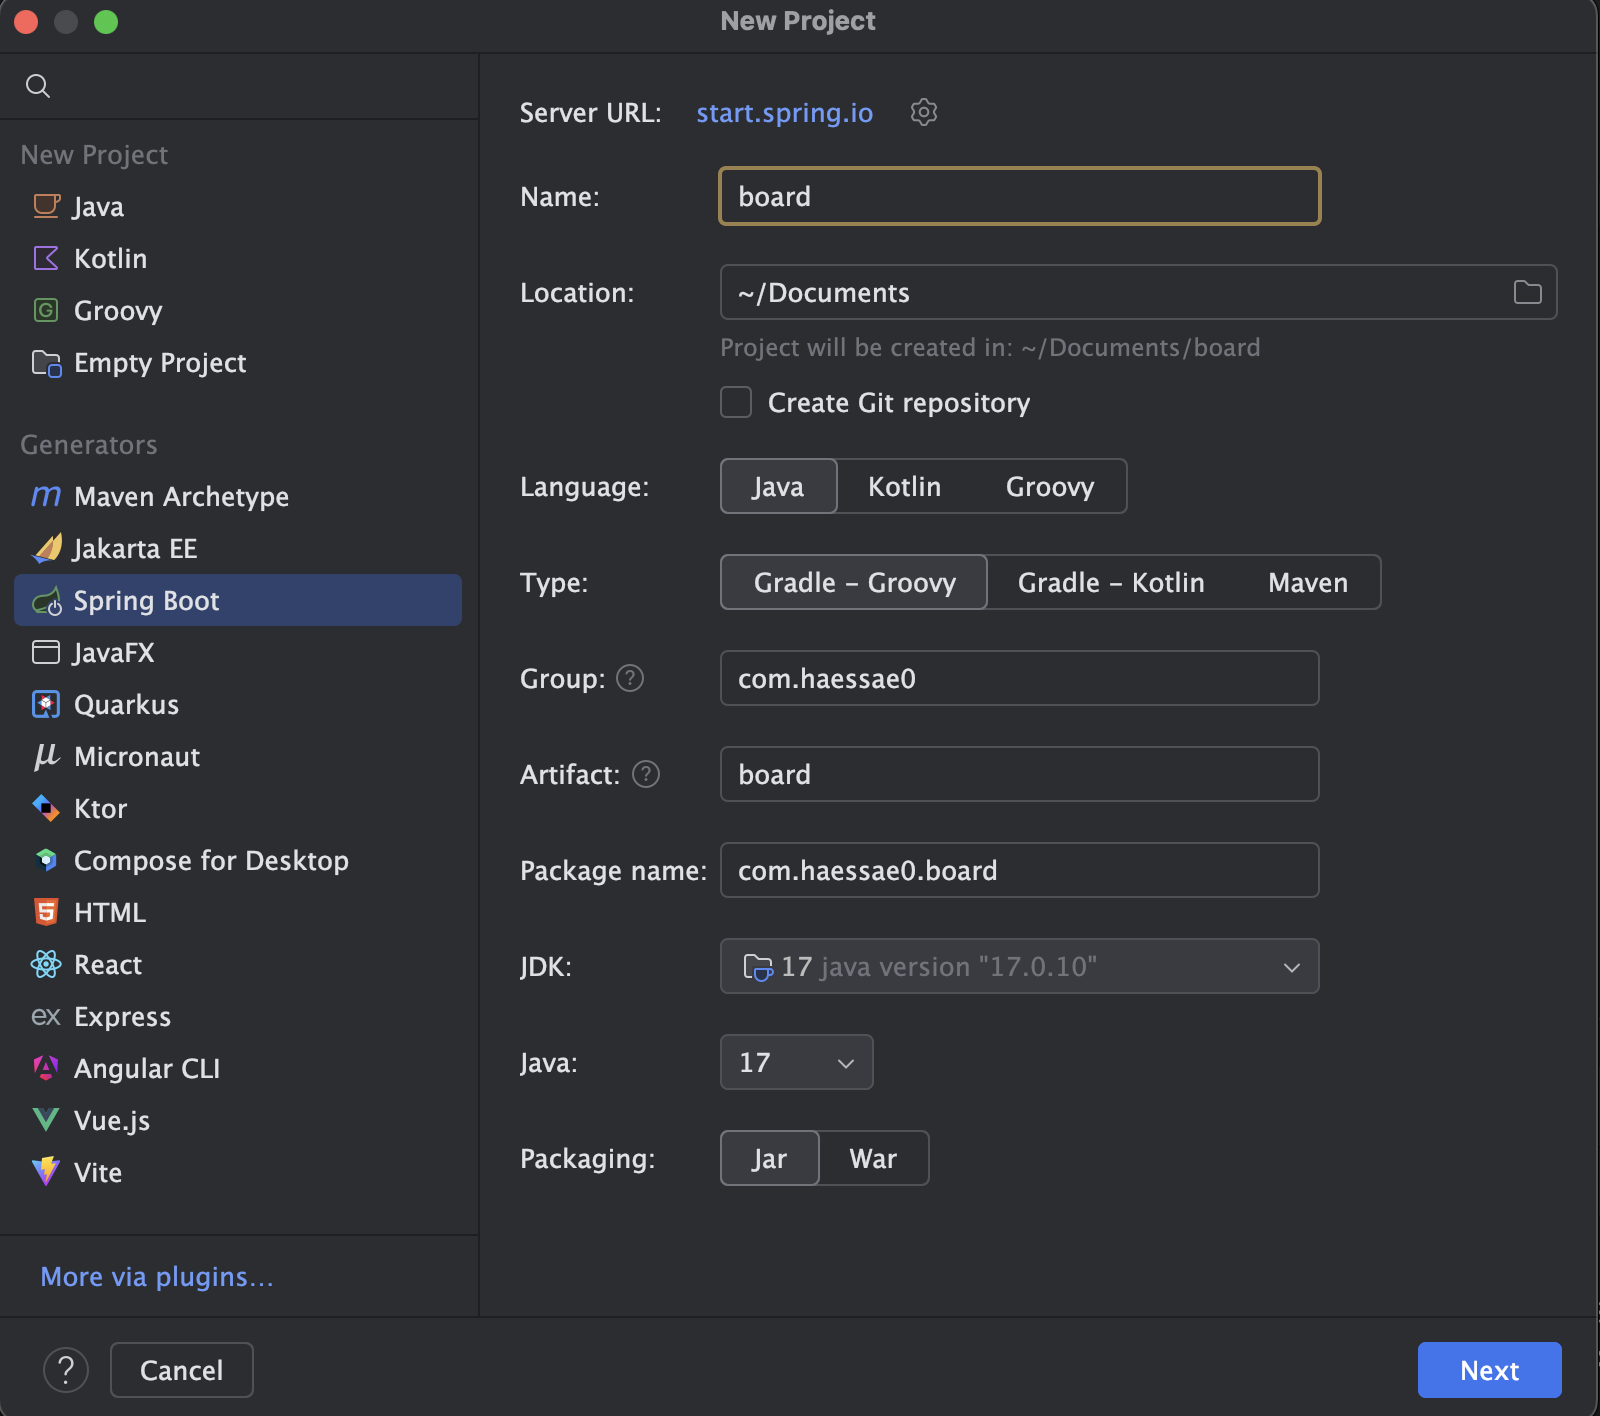
앞서 언급한 프로젝트 스펙대로 맞추고 Next를 눌러 다음 단계로 진행하면 된다.
💡 참고) Group과 Artifact
Group (Group ID)
- group은 주로 프로젝트를 식별하는 도메인 이름이나 조직 이름을 거꾸로 표기한 값이다.
- 프로젝트가 속한 그룹을 나타내며, 주로 Java 패키지 네임스페이스와 연결된다.
- 규칙
- 고유해야 한다.
- 보통 인터넷 도메인을 거꾸로 사용한다.
- 소문자로 작성한다.
Artifact (Artifact ID)
- 프로젝트 이름을 의미한다.
- 추후에 빌드하게 되면 .jar 혹은. war의 이름이 된다.
- 규칙
- 간단 명료한 이름이어야 한다.
- 목적이나 기능을 잘 나타내야 한다.
- 보통 소문자와 - 를 사용한다.
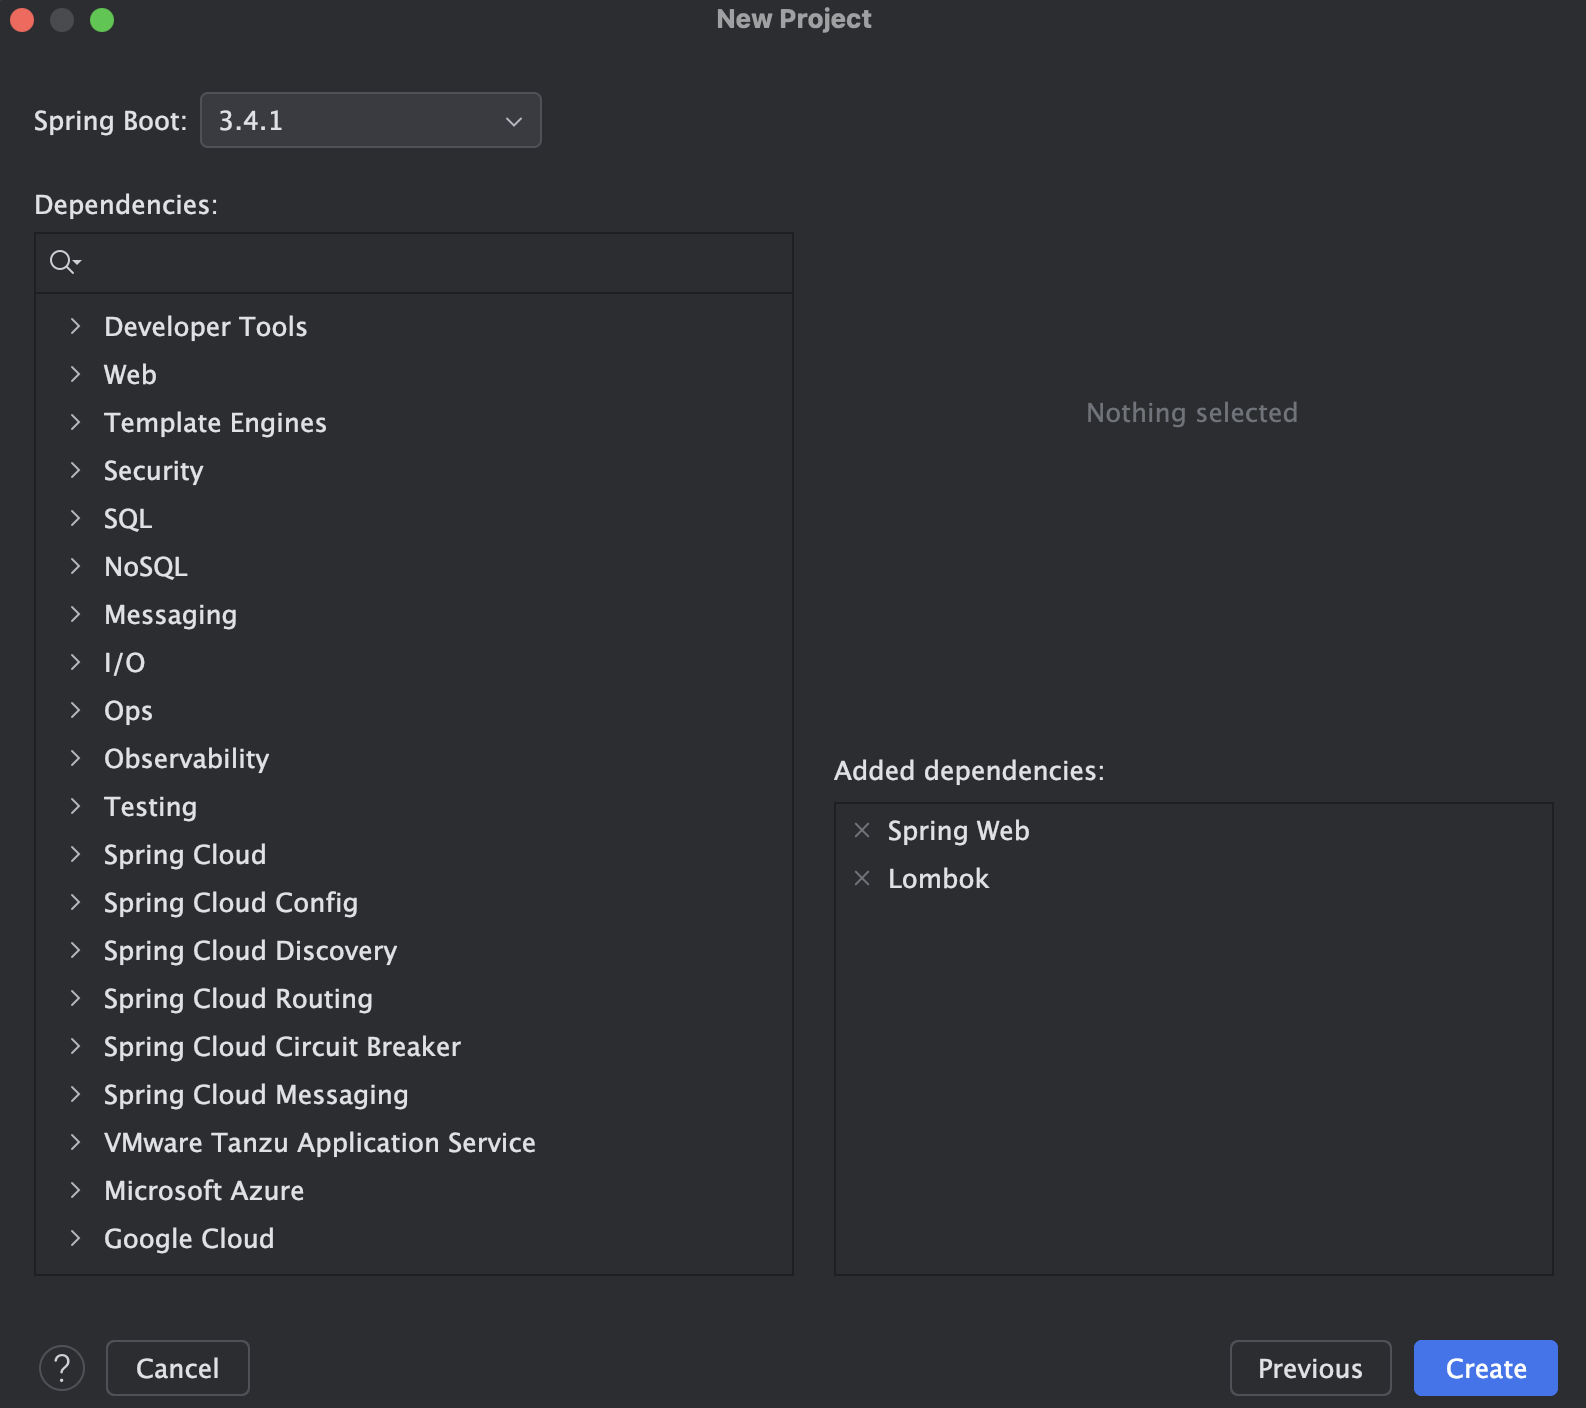
다음 화면으로 가면 Dependency를 추가할 수 있다. 처음에는 Spring Web과 Lombok만을 추가한다.
Thymeleaf 사용하기
Thymeleaf는 Spring 프레임워크에서 주로 사용되는 서버 사이드 템플릿 엔진이다.
장점
- 쉽고 직관적인 문법
- 서버 사이드와 강력한 연동
- 템플릿을 브라우저에서 바로 확인 가능
사용하기
타임리프를 사용하기 위해서는 아래와 같은 의존성을 주입해 주면 된다.
// Thymeleaf 설정
implementation 'org.springframework.boot:spring-boot-starter-thymeleaf'
implementation 'nz.net.ultraq.thymeleaf:thymeleaf-layout-dialect'
- spring-boot-starter-thymeleaf
- Thymeleaf 템플릿 엔진을 사용하기 위한 스타터 패키지이다.
- 템플릿 엔진의 핵심 기능을 제공한다.
- MVC와 Thymeleaf 간의 통합을 지원한다.
- thymeleaf-layout-dialect
- thymeleaf에서 레이아웃과 템플릿 상속 기능을 제공하는 확장 라이브러리이다.
- 재사용 및 상속 구조를 지원한다.
- 공통 레이아웃을 정의하고 여러 페이지에서 사용할 수 있게 해준다.
타임리프의 레이아웃과 관련해서는 아래 포스팅을 참고하면 된다.
DTO
Thymeleaf가 제대로 적용된 것을 확인하기 위해서 간단하게 화면 테스트를 진행하려고 한다.
DTO는 데이터를 안전하게 전달하기 위한 객체이며, 게시글에 사용할 게시글 아이디, 제목, 글쓴이, 생성일자를 테스트 모델로 만든다.
import lombok.AllArgsConstructor;
import lombok.Getter;
import lombok.Setter;

@Setter
@Getter
@AllArgsConstructor
public class BoardPost {
    private Long id;
    private String title;
    private String author;
    private String createdAt;
}
설명
- @Getter
- 각 필드에 대한 getter 메서드를 자동으로 생성한다.
- @Setter
- 각 필드에 대한 setter 메서드를 자동으로 생성한다.
- @AllArgsConstructor
- 모든 필드를 매개변수로 받는 생성자를 자동으로 생한다.
Lombok을 사용하면 Getter, Setter, 생성자 등의 코드를 어노테이션으로 간단하게 대체할 수 있다.
만약, Lombok을 사용하지 않는다면 아래 코드를 사용하면 된다.
public class BoardPost {
    private Long id;
    private String title;
    private String author;
    private String createdAt;

    public BoardPost(Long id, String title, String author, String createdAt) {
        this.id = id;
        this.title = title;
        this.author = author;
        this.createdAt = createdAt;
    }

    public Long getId() {
        return id;
    }

    public void setId(Long id) {
        this.id = id;
    }

    public String getTitle() {
        return title;
    }

    public void setTitle(String title) {
        this.title = title;
    }

    public String getAuthor() {
        return author;
    }

    public void setAuthor(String author) {
        this.author = author;
    }

    public String getCreatedAt() {
        return createdAt;
    }

    public void setCreatedAt(String createdAt) {
        this.createdAt = createdAt;
    }
}
Controller
게시판 데이터를 전달하기 위해 BoardController를 작성한다.
import com.haessae0.board.dto.BoardPost;
import org.springframework.stereotype.Controller;
import org.springframework.ui.Model;
import org.springframework.web.bind.annotation.GetMapping;

import java.util.ArrayList;
import java.util.List;

@Controller
public class BoardController {

    @GetMapping("/board")
    public String boardList(Model model) {
        List<BoardPost> posts = new ArrayList<>();
        posts.add(new BoardPost(1L, "첫 번째 게시글", "홍길동", "2024-04-01"));
        posts.add(new BoardPost(2L, "두 번째 게시글", "김철수", "2024-04-02"));
        posts.add(new BoardPost(3L, "세 번째 게시글", "이영희", "2024-04-03"));
        posts.add(new BoardPost(4L, "네 번째 게시글", "박민수", "2024-04-03"));

        model.addAttribute("boardList", posts);
        return "board/list";
    }
}
설명
- @Controller
- BoardController 클래스를 Spring MVC 컨트롤러로 등록한다.
- @GetMapping
- /board 엔드포인트로 GET 요청이 들어오면 메서드가 실행되고 Model 객체를 통해 boardList라는 데이터가 뷰로 데이터가 전달된다.
화면 구성
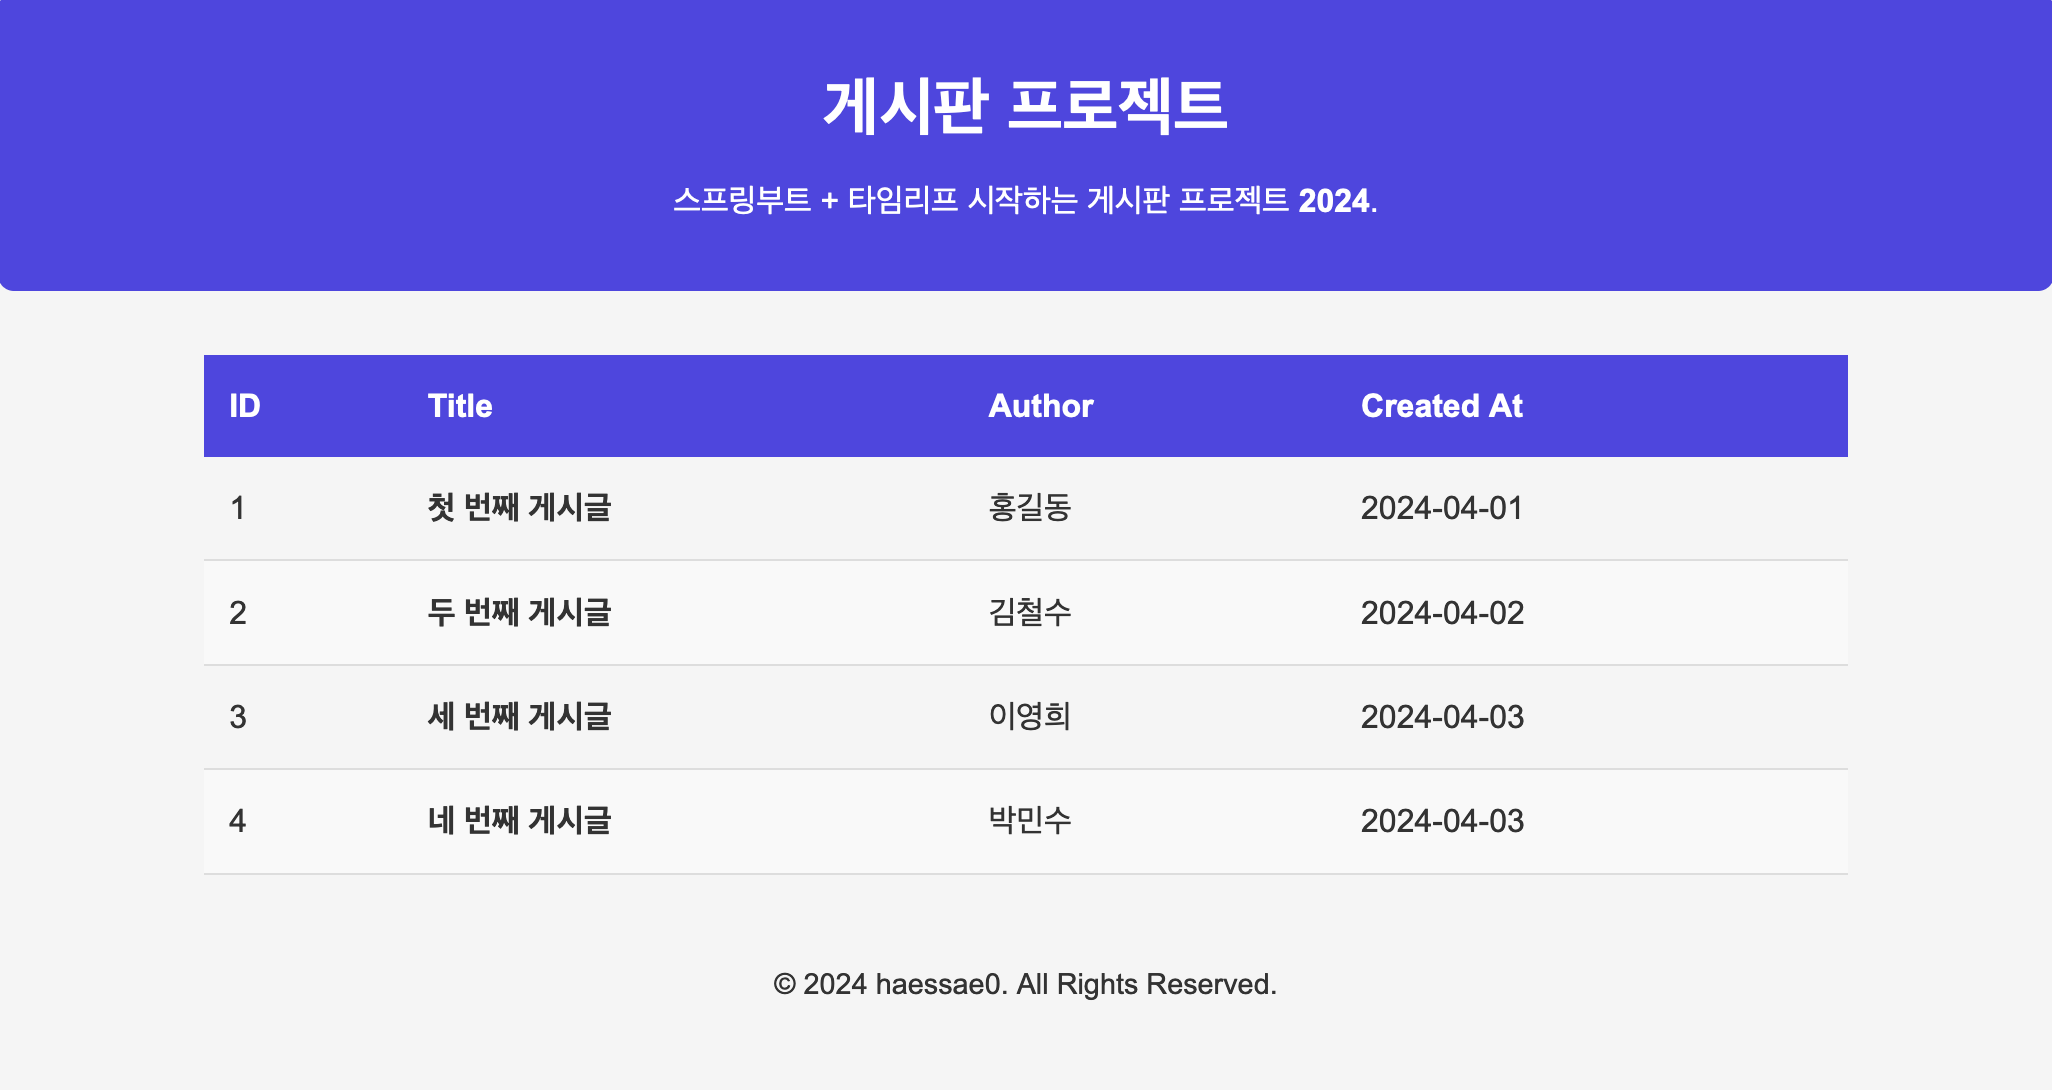
화면은 위와 같이 구현해보려고 한다.
<!DOCTYPE html>
<html xmlns:th="http://www.thymeleaf.org">
<head>
<meta charset="UTF-8">
<title>게시판 프로젝트</title>
<link rel="stylesheet" th:href="@{/css/style.css}">
</head>
<body>
<header class="header">
<h1>게시판 프로젝트</h1>
<p>스프링부트 + 타임리프 시작하는 게시판 프로젝트 <strong>2024</strong>.</p>
</header>
<main>
<section class="board-list">
<table>
<thead>
<tr>
<th>ID</th>
<th>Title</th>
<th>Author</th>
<th>Created At</th>
</tr>
</thead>
<tbody>
<tr th:each="board : ${boardList}">
<td th:text="${board.id}">1</td>
<td>
<a href="#" th:text="${board.title}">Sample Post</a>
</td>
<td th:text="${board.author}">Author</td>
<td th:text="${board.createdAt}">2024-06-29</td>
</tr>
</tbody>
</table>
</section>
</main>
<footer>
<p>© 2024 haessae0. All Rights Reserved.</p>
</footer>
</body>
</html>
CSS는 더보기에 남겨놓겠다.
body, h1, h2, p {
    margin: 0;
    padding: 0;
}

body {
    font-family: 'Arial', sans-serif;
    line-height: 1.6;
    background-color: var(--bg-color);
    color: var(--text-color);
    transition: background-color 0.3s ease, color 0.3s ease;
}

:root {
    --bg-color: #f5f5f5;
    --text-color: #333;
    --header-bg: #4f46e5;
    --header-text: #fff;
}

body.dark-mode {
    --bg-color: #1e1e2f;
    --text-color: #e0e0e0;
    --header-bg: #2c2c3f;
    --header-text: #fff;
}

.header {
    background-color: var(--header-bg);
    color: var(--header-text);
    text-align: center;
    padding: 2em 0;
    border-radius: 8px;
    margin-bottom: 2em;
}

.header h1 {
    font-size: 2em;
    font-weight: bold;
}

.header p {
    margin-top: 0.5em;
}

#theme-toggle {
    margin-top: 1em;
    background-color: #ffc107;
    border: none;
    padding: 0.5em 1em;
    cursor: pointer;
    font-size: 1em;
    border-radius: 5px;
}

.board-list {
    width: 80%;
    margin: auto;
    overflow-x: auto;
}

table {
    width: 100%;
    border-collapse: collapse;
}

thead {
    background-color: var(--header-bg);
    color: var(--header-text);
}

thead th {
    padding: 0.8em;
    text-align: left;
}

tbody tr {
    border-bottom: 1px solid #ddd;
}

tbody tr:nth-child(even) {
    background-color: #f9f9f9;
}

body.dark-mode tbody tr:nth-child(even) {
    background-color: #2a2a3c;
}

tbody td {
    padding: 0.8em;
    text-align: left;
}

tbody a {
    color: var(--text-color);
    font-weight: bold;
    text-decoration: none;
}

tbody a:hover {
    text-decoration: underline;
}

footer {
    text-align: center;
    margin-top: 2em;
    padding: 1em;
    font-size: 0.9em;
}
설명
- th:each
- Model을 통해서 넘겨받은 데이터인 boardList에서 BoardPost 항목을 하나씩 꺼내어 반복한다.
- th:text
- 각 항목의 필드 값을 텍스트로 출력하게 해 준다.
- th:href
- CSS, JS와 같은 정적 파일 경로를 동적으로 설정한다.
다음 게시글
다음 게시글은 데이터베이스 연결 및 기본적인 CRUD 하는 과정에 대해서 다뤄보려고 한다.
Github
https://github.com/haessae0/2024_board_project
GitHub - haessae0/2024_board_project: https://abuuu.tistory.com/28
https://abuuu.tistory.com/28. Contribute to haessae0/2024_board_project development by creating an account on GitHub.
github.com
'Project > 게시판 프로젝트' 카테고리의 다른 글
| 스프링부트 + 타임리프 시작하는 게시판 프로젝트: 프로젝트 소개 및 진행 계획 (0) | 2024.12.23 |
|---|